
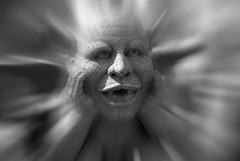
The zoom (during exposure) effect is a classic special effect technique that can be traced back to early film photography era. By zooming the lens during a long exposure (typically 1/4s to a few seconds), photographer can create dramatic radiating streaks from center of the frame. This is a great technique to accentuate motion or create tension in photographs. Here are three different ways to achieve the classic zoom effect today.
The classic method for the classic zoom effect
For this technique to work, you obviously need a zoom lens and are able to create long exposures of about 1/4s and longer. The slow shutter speed can be achieved by shooting in dim lighting condition, reducing ISO setting, stopping down the lens, or using a neutral density (ND) filter.
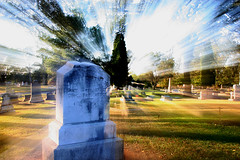
For best result, mount the camera on a tripod, compose and focus the subject at exact center of the frame. Move the zoom lens from a longer focal length to a shorter focal length as soon as the shutter is open. You will need to experiment a little bit to find out the best zoom speed and the range of focal length. This technique works best when you have a busy background or plenty of bright spots that create the streaks. There are also several variants of this technique. One of them is the so-called step zoom as shown in the title photo. For some excellent articles on this topic, please visit the following links:
- Click and zoom (AIRC)
- Mastering the zoom effect (dPS)
Use a special effect filter
The classic method is fun to experiment but it can be very tricky to master. One of the easier alternatives is to use a Cokin radial zoom filter (filter #185 in its creative filter system). It should make your life a lot easier. To get the setup to work, you will need to have an adapter ring for your lens, a filter holder that clips on to the adapter ring and accepts the filters, and the filter. Visit Cafe Cokin if you have questions on Cokin filter system.
The Photoshop magic
It is also quite easy to create the zoom effect in Adobe Photoshop. You can adjust the amount of the effect to your taste to simulate the speed of turning the zoom ring. You can also place the center of the zoom where you want instead of center of the frame. Follow these simple steps to master this Photoshop zoom effect:
- Open the image in Photoshop.
- Duplicate the layer.
- Select the duplicated layer, go to Filter->Blur->Radial Blur, change the blur method to zoom, select the quality (draft, good, or best), click and drag to select the blur center. There is no preview, so you may have to experiment it to get the effect you want.
- With the duplicated filter selected, add a layer mask.
- Choose the gradient tool and select the black-white radial gradient. Click on the center of the zoom and drag it out to where you want. Make sure the center of the gradient is black, which will reveal the background layer to give you a clear center. If the effect you get is the opposite, check the “Reverse” box to reverse the gradient color and try again.
No comments:
Post a Comment