 A Walk in the misty Morning
 Portrait:Bite of time
 Rose Garden:Tikatuli,Dhaka,Bangladesh
 Harvest in a remote village
 Fancy good seller:taken from Ekushey Boimela 2010
Copy Right:Shubho Salateen
A Walk in the misty Morning Portrait:Bite of timeRose Garden:Tikatuli,Dhaka,BangladeshHarvest in a remote villageFancy good seller:taken from Ekushey Boimela 2010Getting correct exposure with most simple auto-exposure cameras is easy: press the shutter button and the camera does the rest. More technologically evolved (i.e., expensive) cameras often provide a choice of several exposure and metering modes. Having to maneuver through a labyrinth of optional modes may seem somewhat anti-automatic at first, but in reality they enable you to become the master of, rather than a slave to, automation.
Exposure modes. A choice of different exposure modes enables you to manipulate the camera's selection of shutter speeds and apertures to match a particular type of subject: you can tell it to pick a fast shutter speed because you're photographing a race horse, for instance. Generally, the more costly the camera, the more modes you'll have to choose from, but these are the most common options:
In Program Mode, you accept the role of technological slave and the camera selects both the shutter speed and the aperture for you. It is often called the green mode because it's frequently marked by a green "P" on the mode-selector dial. The camera will choose a shutter speed that is safe enough for hand holding and an aperture that will provide a moderate amount of depth of field. It's ideal for shooting relatively stationary subjects (like a tall ship sitting at anchor) that don't require either a very fast (or slow) shutter speed or excessive (or excessively shallow) depth of field.
In shutter-priority mode you choose the shutter speed and the camera selects an appropriate corresponding aperture. If you want to blur the water rushing over a waterfall, for example, you can select a very slow shutter speed and the camera will choose the correct aperture. Conversely, if you want to halt a bounding terrier in mid stride, you can pick a fast shutter speed and, again, the camera will select an appropriate aperture.
The aperture priority mode, as you've no doubt guessed, lets you pick the aperture, while the camera selects the matching shutter speed. This is the mode to choose when you want to manipulate depth of field. For example, you could set a small aperture for extensive depth of field (in a landscape, for example) or a large one when you want to limit depth (as in a portrait).
Metering modes allow you to control what part of a scene the meter will take its reading from—a useful capability when it comes to getting good exposure in difficult lighting situations.
Matrix metering is used in virtually all digital cameras for the simple reason that it is the most reliable and sophisticated type of in-camera metering. Matrix metering works by dividing the viewing area into a series of key zones and taking separate readings from each of them. This information is then fed into a computer chip that has been programmed with literally hundreds of thousands of potential lighting combinations; the meter then makes an educated guess at what the important parts of the scene are and exposes accordingly.
Center-weighted metering is a type of "averaging" meter where the entire viewfinder image is metered but the reading area is "weighted" to give more emphasis to an area at the center of the frame. Typically the meter will give 75 percent emphasis to the material at the center of the frame and 25 percent to the remaining area of the frame. The logic of this method of metering is that since most people place their subjects in the center of the frame, that's where the most important metering should be done. Is it accurate? Yes, if you place your subjects in the center (at least during metering). You can place an important subject in the center for metering purposes and then use your exposure lock feature (on most cameras, just hold the shutter button halfway down) to hold that reading while you recompose the image.
Spot metering is a further refinement of center-weighted metering, but spot meters read only a tiny portion at the center of the frame—usually from 3-5 percent of the frame. This method of metering is very accurate if you are careful to read only the most important area of the frame. Imagine a scene where the important subject area (a person cross-country skiing, for example) is surrounded by a large field of bright or dark subject matter (a snowy field). By using spot metering, you can meter just the subject and exclude the large area of snow that would fool your meter.

For this technique to work, you obviously need a zoom lens and are able to create long exposures of about 1/4s and longer. The slow shutter speed can be achieved by shooting in dim lighting condition, reducing ISO setting, stopping down the lens, or using a neutral density (ND) filter.
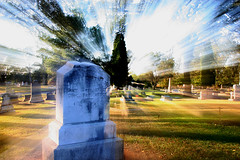
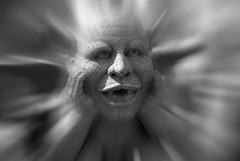
For best result, mount the camera on a tripod, compose and focus the subject at exact center of the frame. Move the zoom lens from a longer focal length to a shorter focal length as soon as the shutter is open. You will need to experiment a little bit to find out the best zoom speed and the range of focal length. This technique works best when you have a busy background or plenty of bright spots that create the streaks. There are also several variants of this technique. One of them is the so-called step zoom as shown in the title photo. For some excellent articles on this topic, please visit the following links:
The classic method is fun to experiment but it can be very tricky to master. One of the easier alternatives is to use a Cokin radial zoom filter (filter #185 in its creative filter system). It should make your life a lot easier. To get the setup to work, you will need to have an adapter ring for your lens, a filter holder that clips on to the adapter ring and accepts the filters, and the filter. Visit Cafe Cokin if you have questions on Cokin filter system.
It is also quite easy to create the zoom effect in Adobe Photoshop. You can adjust the amount of the effect to your taste to simulate the speed of turning the zoom ring. You can also place the center of the zoom where you want instead of center of the frame. Follow these simple steps to master this Photoshop zoom effect: